Front End Insights Navigation (Gold Suppliers)
This article will cover the following topics:
When you log into Front End Insights (FEI) you will arrive on the My Reports page. We will review your tab navigation in three sections:
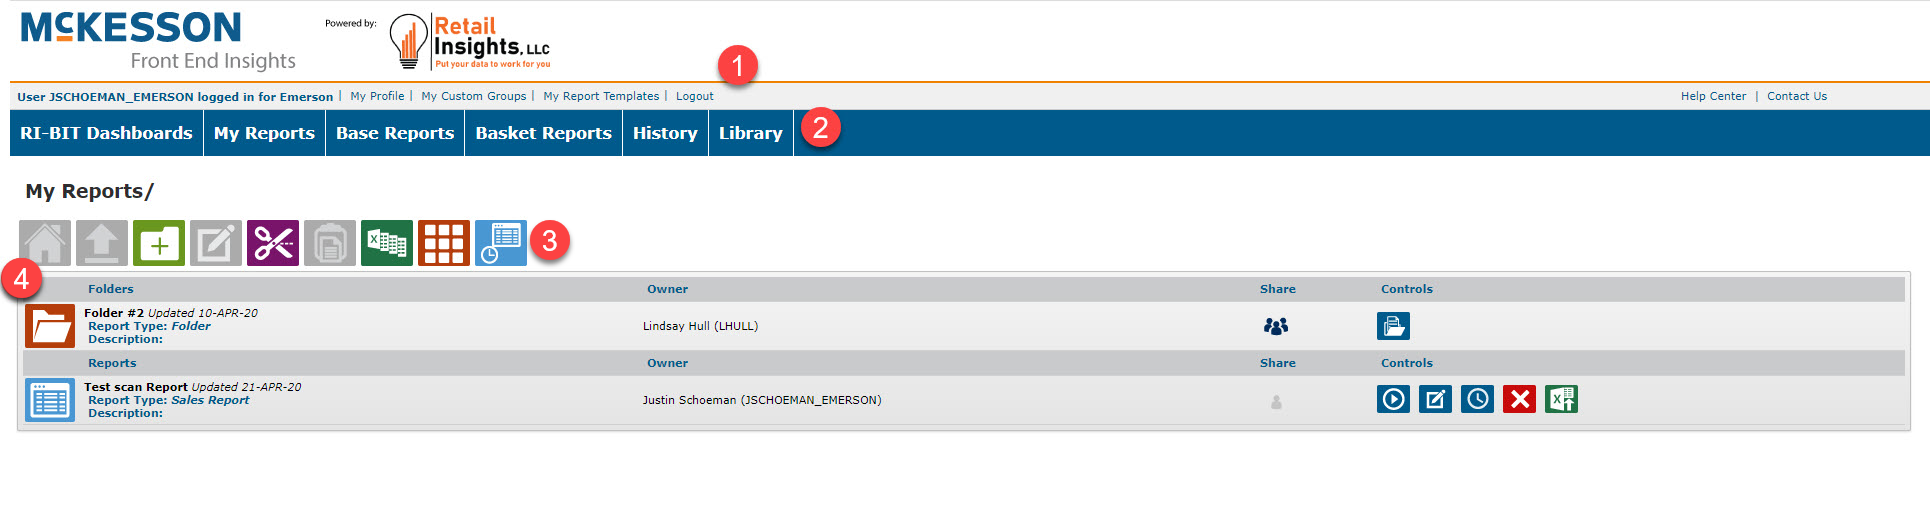
Section 1: Top Panel
Your top panel contains 4 options:
- My Profile
- My Custom Groups
- My Report Templates
- Logout
My Profile
The My Profile section allows you to update your contact information and preferences:
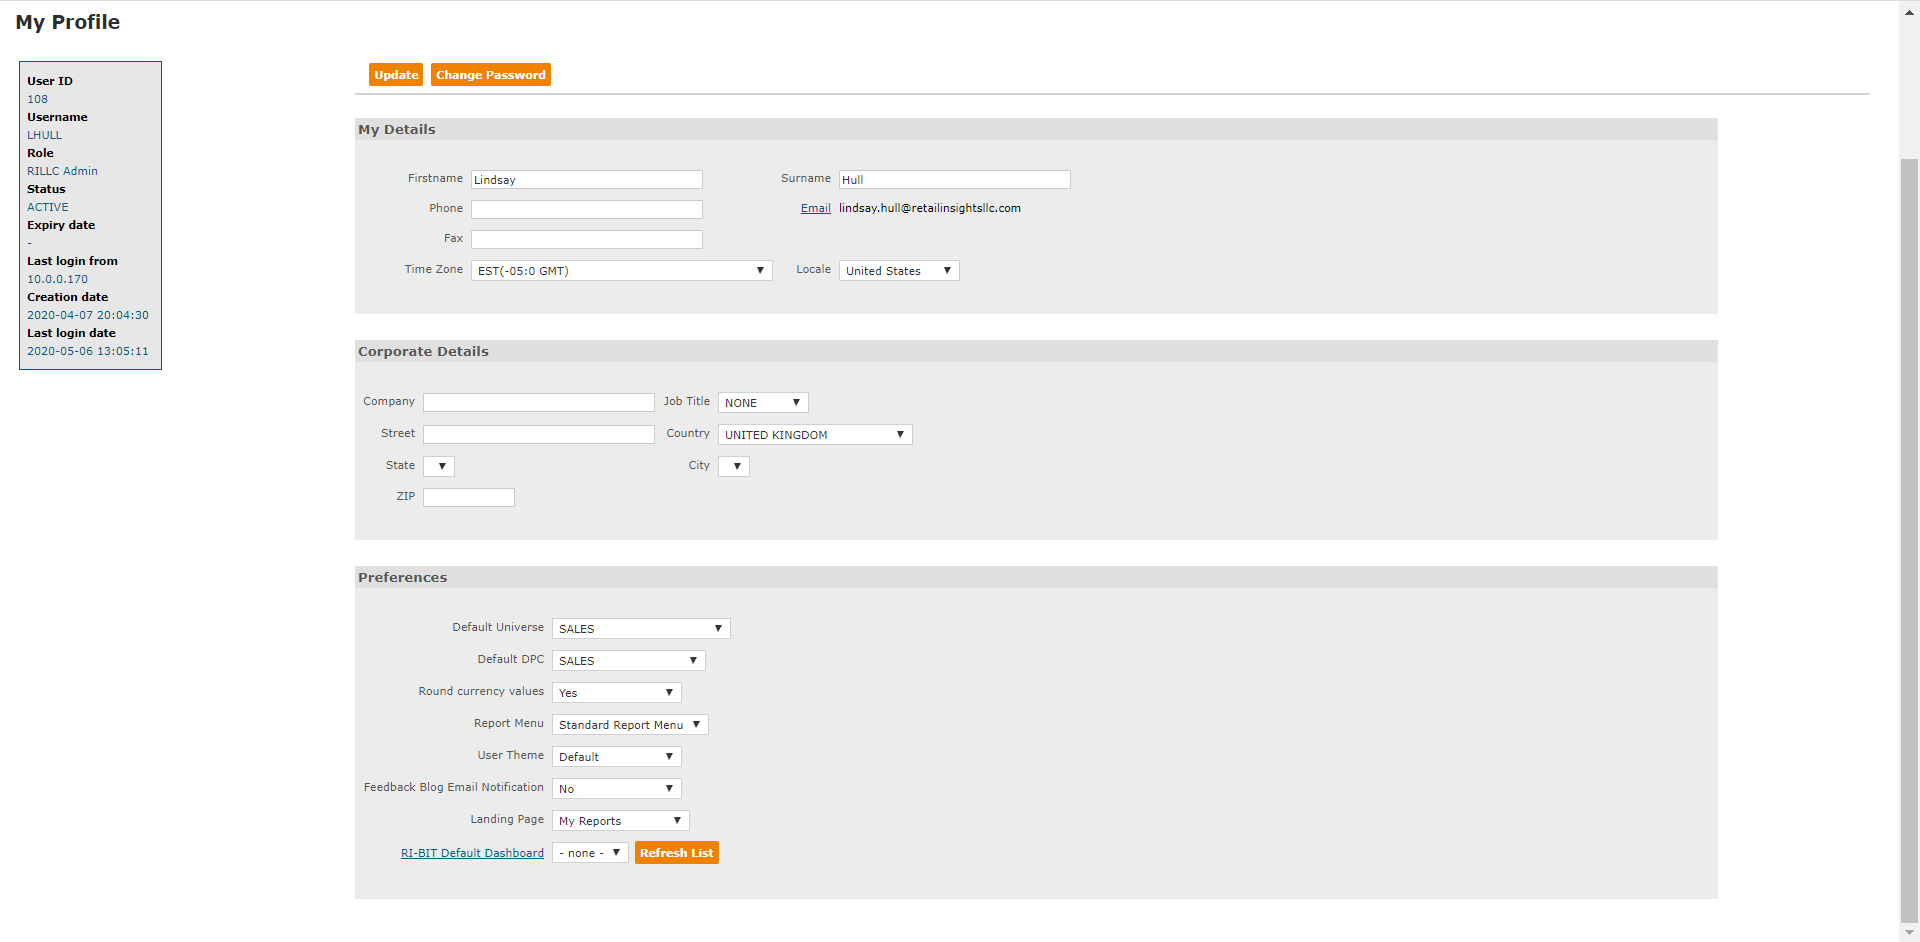
The first two sections of the page allow you to update you and your company's contact information. If you need to update your email address, please contact our support team by clicking the Contact Us button at the top right of your screen.
The last section, Preferences, allows you to update how you view your FEI portal. You can choose to update your Landing Page to Library (it is automatically set to My Reports) and you can choose a default Ri-BIT dashboard.
Once you have completed your updates, click the Update button.
Change Password
You have the option to change your password or memorable word by clicking on the My Profile link at the top of your page. Click on the Change Password button to reset your password.
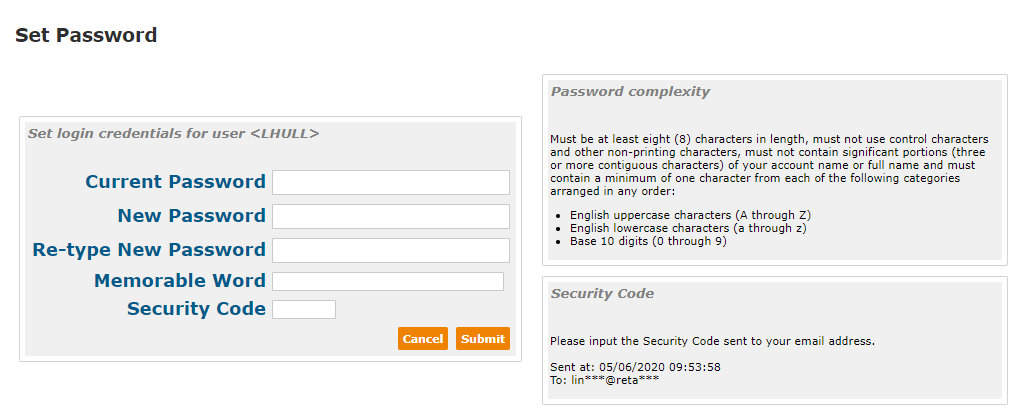
You may choose to only reset your password, only reset your memorable word, or reset both. Prior to resetting, you will be required to enter your security code. On the right side of your screen, you will see where and when the security code was sent to you.
Logging Out
Next to the My Profile button, you will find your Logout button. Clicking this button will bring you back to your Login page. If your FEI page has been inactive for 8 minutes, you will see a warning that FEI will log you out in 120 seconds. You may choose to continue with your session, or logout. If no choice is made, FEI will automatically log you out after 120 seconds.
My Custom Groups
This section allows you to add your own lists to FEI to use when running reports. Please visit our article on Importing a Custom Group to learn more.
My Report Template
This function allows you to associate an Excel file template with a saved report. If a template is present, the dataset from the saved report will be injected into the first sheet of the spreadsheet template. Please visit our article on Importing a Report Template to learn more.
Store Lookup
This function will allow you to view a list of all customers and customer information.
Section 2: Main Panel Navigation
This sections helps you navigate through your FEI portal. No matter what page you are on, you will always see this menu at the top of your screen. Hover over a header to view the dropdown menu:
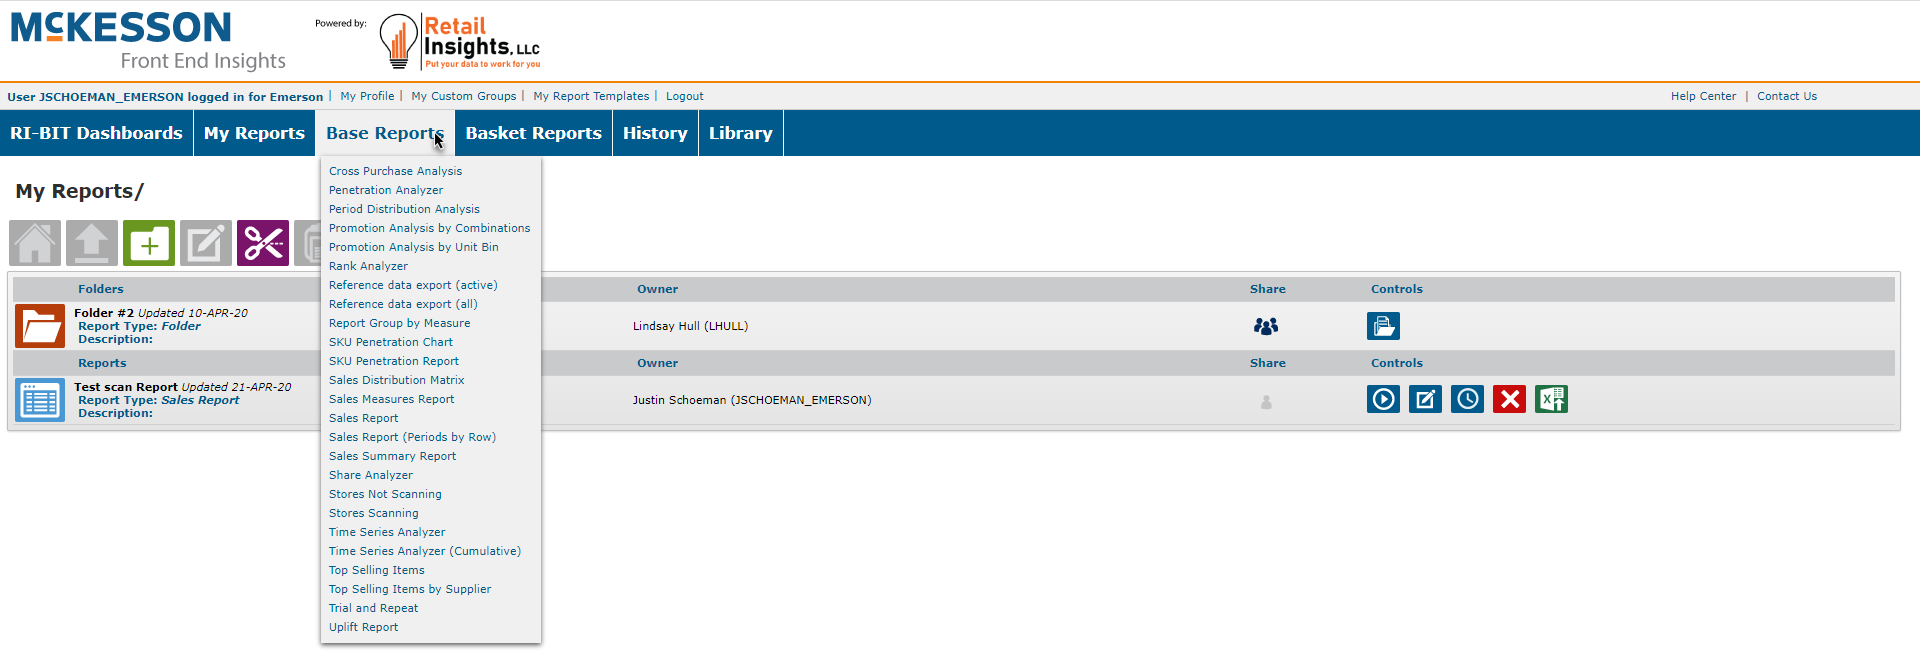
The following articles are available to assist you in navigating each section of your Main Panel:
- How to use Ri-BIT
- How to Run a Sales Report
- How to Run a Sales Distribution Matrix
- Basic Report use functions
History
Any report that you have previously run will be located in your History section.

Your previously run reports will stay in your History List for 30 days. If you would like your report to stay in your list for a longer/shorter amount of time, click on the '30' number in the Save (days) column. A dropdown will appear allowing you to select a different time period.

Any report can be downloaded by clicking on the CSV or XLS links next to the report. You may view any report by clicking the View link. Clicking Delete will remove the report from your History List.
Library
Clicking on the Library tab will bring you to your library. Here, you will see all reports and files that have been shared to you.
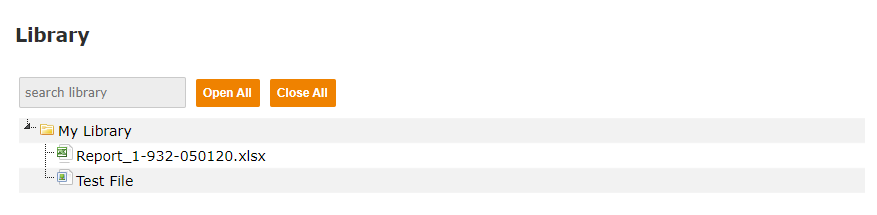
Double click on any folder icon to expand your view. Click the Open All button at the top of the page to expand all folders. Click a file to download to your desktop.
Section 3: Control Panel
Your Control Panel is located below the My Report title. Below, is a description of each option you will see in your control panel.
 Clicking on this button will take you back to the screen above.
 Moves a report up one level in the folder you are viewing.
 Use this button to create a new folder within your My Reports section. You can then cut and paste reports into the new folder to help keep your reports organized. When you click on this button, you will see the screen below. Type the name of the folder that you would like to create and click the Create button.
 This will allow you to edit the name of a Folder you have created. First, you will need to click on the folder icon in the Controls panel. Then, the edit icon will turn blue, letting you edit the name of the folder.
 You will use this button to move reports from one folder to another. To use this button:
1. Click on any report in your My Reports folder that you are the owner of.
2. Click on the Scissors button to “Cut” the report. You will receive confirmation that the report has been moved to the clipboard. Please note that you can only move YOUR OWN reports. You cannot move any reports that have been shared to you.
3. Click into the folder where you want to move the report and click Paste. You will use the next button for that function.
 Once you click into the folder where you want to move the report, click the Paste button to paste it into the folder. You will receive confirmation that the report has been moved, and you will now see it in the selected folder.
 This icon will allow you to create an Excel Report Group. This will allow you to put multiple reports together so they can be run, scheduled, and/or exported as a single Excel file with each report on a separate tab.
Clicking on the icon will open a window allowing you to name your report group and select the reports you would like in the group.
Select the reports you would like to add to your group by clicking on the Report name in the left column. This will move the report over to the Selected Reports column. You can move your report selections up or down using the arrows in the right column. To remove a report from the group, click the X icon.
Once created, this group will show up below the Folders section.
 Clicking on this button will change the view of your My Reports from either a List View to an Icon View, or from the Icon View to the List View
 Clicking this button will bring you to a new page where you can see all the reports you have scheduled and the frequency in which the reports are scheduled to run. If a report is scheduled to stop running, you can extend the report by clicking the Edit Schedule button.
Section 4: My Reports
The My Reports section contains three different sections: Folders, Excel Groups, and Reports.
Folders
The Folders section allows you to view multiple saved reports that have been created by your group, or have been shared to you or your group. Click on the folder icon in the Controls column (the right-most column on your screen) to view the reports within your folder:
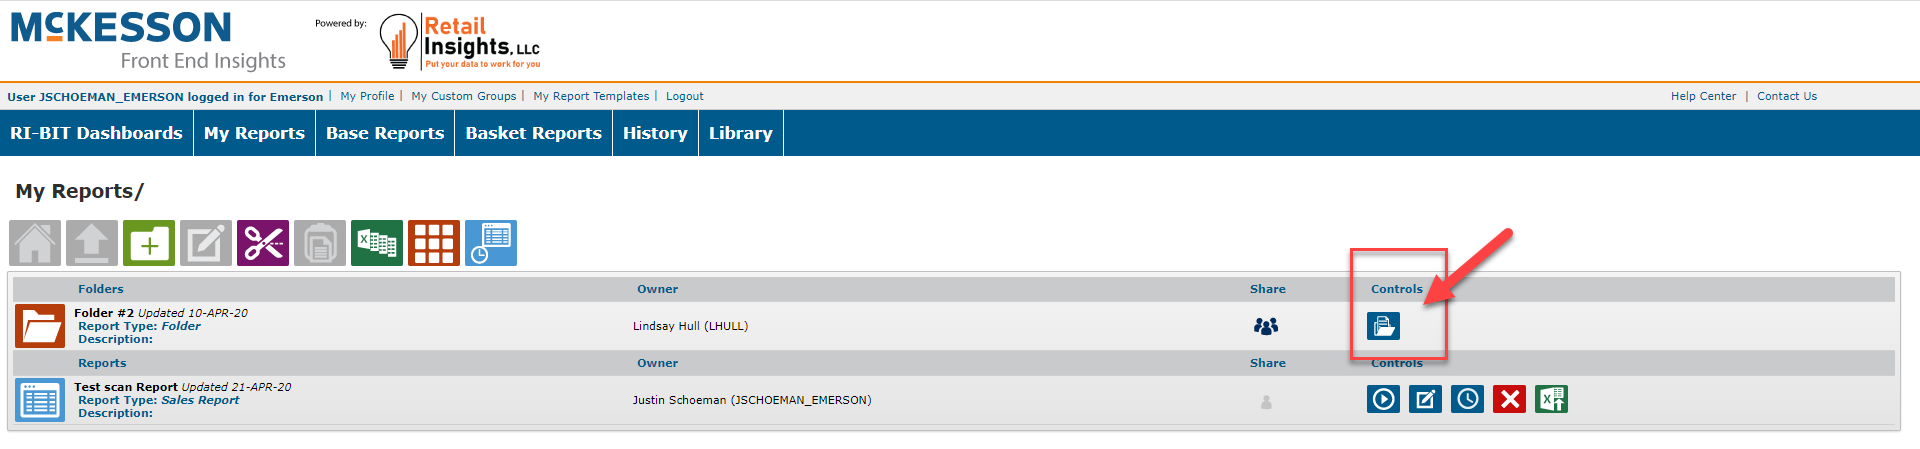
From this page, you have additional options in your Controls section:
 Click this button to run the report
 Click the button to edit the report
 Click this button to schedule the report to run in the future
 Click this button to delete the report from the folder
 Click this button to upload a template
Excel Report Groups
This section allows you to run multiple reports at once. If this type of report is downloaded, each tab will contain a different report in your Excel Group.
Reports
This section contains any reports you or your group has saved. It will also contain any reports that have been shared to you. Use the icons in the Folders section above to run, edit, schedule, or delete a report.
How Do I Share a Report?
Reports and folders can be shared by clicking on the silhouette icon in the Share column of the My Reports page. You may notice that there are different color silhouette icons. Below explains the difference:
 A blue icon means another user has shared a report or folder with you. You cannot share these reports or folders.
 A green icon means you have shared a report or folder with another user or group. You may un-share or share these reports or folder with more or less users at any time.
 A gray icon means this report or folder is owned by you and other user or group has access. This icon also means that you may share with any user or group.
To share (or un-share) a report:
1. Click on the silhouette icon. A pop-up box will appear:
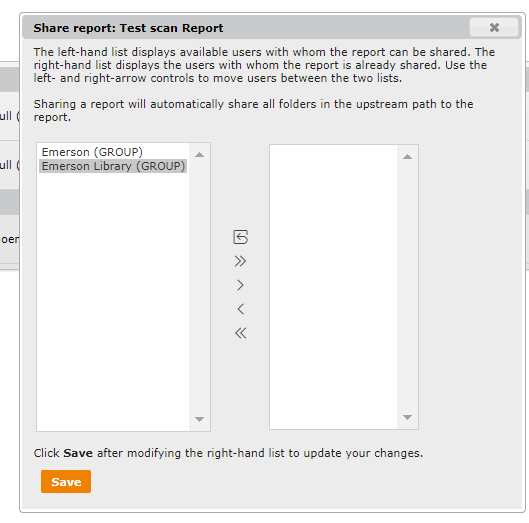
2. You may share your report or folder with any user in the left column. Click on one or multiple options in the left column and then click the right arrow button. This will bring the user/group to the 'shared' column. To remove any user/group from the shared column, click the right arrow button to move them back to the left column.
3. Click Save to update your shared settings.
How Do I Schedule a Report?
Scheduling a report allows you to have a specific report run at a set time monthly, weekly, or daily. You can also choose to have the report emailed to you or saved in your Library section. To schedule a report:
1. Click on the clock icon in the Controls column. A pop-up box will appear:
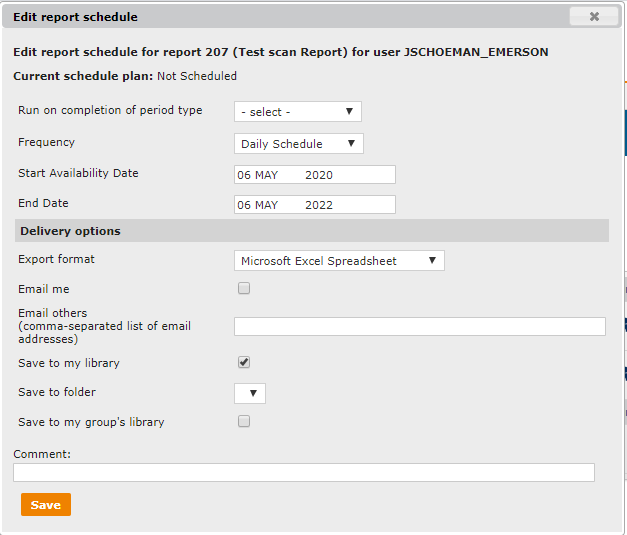
2. Set your preferences in the pop-up box.
3. Click Save.